Containerized Consoles #
Containerized Consoles were added in SynergyCP 5.3.x. Your installation must be running 5.3.x or later to use this feature.
Containerized Consoles give your customers browser-based access to a server’s IPMI/BMC KVM console without needing the right Java version, a compatible browser, or direct network access to the BMC. When a user clicks Launch KVM, SynergyCP spins up a disposable Docker container on a dedicated Console Server. That container runs a full graphical stack (a browser and the Java Web Start runtime) that connects to the BMC’s KVM console on the user’s behalf and streams the result to their browser as an HTML5 VNC session over HTTPS.
This solves the long-standing problems with legacy IPMI KVM consoles: out-of-date Java applets, self-signed and expired BMC certificates, and BMCs that live on a private network the customer can’t reach directly.
Containerized Consoles are really only intended for very old servers whose BMCs have no HTML5 console (for example, BMCs that still rely on a Java applet). For newer servers that already have an HTML5 console, we recommend a BMC Forwarding Gateway with the server’s Launch KVM Action set to Open IPMI Login Page instead.
How It Works #
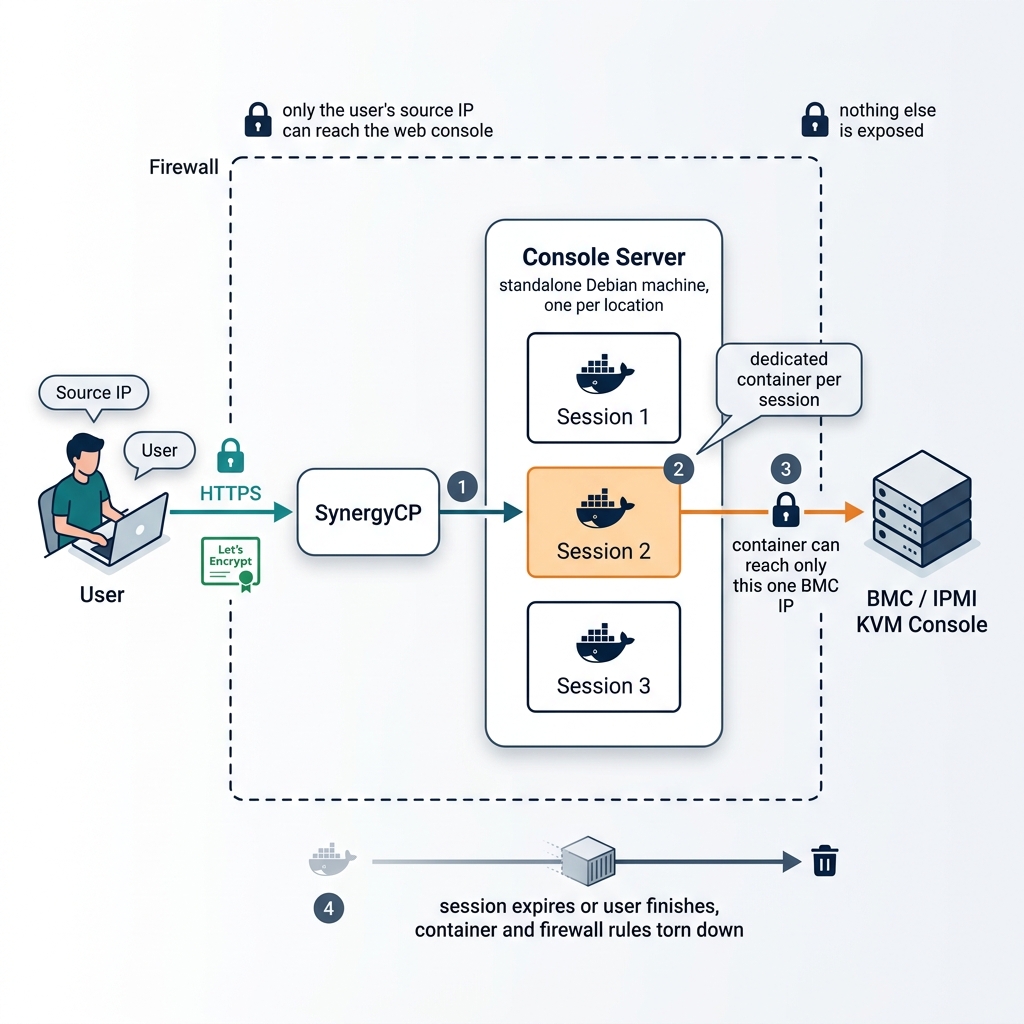
When a user launches a console for a server that is configured for Containerized Consoles:
- SynergyCP picks a healthy Console Server assigned to that server’s location (IP Group) and asks it to create a session, passing the user’s source IP and the server’s BMC IP.
- The Console Server starts a Docker container dedicated to that one session. The container opens the BMC’s KVM console internally.
- The Console Server terminates HTTPS using an automatically issued Let’s Encrypt certificate and gives the user a private URL to the session.
- Network access is locked down on both sides: only the user’s source IP can reach the web console, and the container can only reach that one BMC IP. Nothing else is exposed.
- When the user is finished — or after the session expires — the container and its firewall rules are torn down.
A Console Server is a standalone Debian machine you provision once per location. It can run many concurrent sessions, each fully isolated from the others.
Choosing a KVM access method #
SynergyCP offers more than one way to give users KVM access. You set the method per server, so you can mix and match.
- Containerized Console — SynergyCP brokers the entire KVM session inside a container and hands the user a clean HTML5 console. Best when the BMC uses an old Java applet, has an untrusted certificate, or lives on a private network. This is the method described on this page.
- Proxy Java JNLP File — SynergyCP downloads the BMC’s
.jnlplaunch file and proxies it to the user, who runs it with their own local Java. - Open IPMI Login Page — opens the BMC’s own web interface directly in the user’s browser.
Containerized Consoles and BMC Forwarding Gateways complement each other. A Forwarding Gateway puts the BMC on a private LAN and brokers raw network access to it; a Containerized Console brokers the full console experience. You can use a Console Server on its own, or alongside a gateway for BMCs that are on a private network.
Setup #
1. Provision a Console Server #
Provision a server or VM with a fresh install of Debian 13 that can reach the BMC network for the location it will serve. Do not reuse an existing server, as the installer sets up Docker and binds ports 80 and 443.
We do not recommend installing the Console Server on your SynergyCP master server. It sets up its own Docker stack, which can interfere with the Docker Swarm that runs the main SynergyCP application. Always use a separate, dedicated machine or VM.
The machine needs:
- A public, fully qualified hostname (for example
console.example.com) with a public DNS A record pointing at the machine. This is required so the Console Server can obtain a Let’s Encrypt SSL certificate and so customers can reach the console over HTTPS. - Network access to the BMC/IPMI IPs of the servers at that location.
Before going further, confirm the Console Server host can actually reach the BMC network — for example, ping and curl a known BMC IP and verify you get a response:
ping -c 3 <bmc-ip>
curl -k -I https://<bmc-ip>
If the host node itself cannot reach the BMCs, neither can the containers it runs, and consoles will fail to connect.
2. Install the Console Server software #
Run the following command on the new server as root:
curl -fsSL https://distribution.synergycp.com/scripts/console-server-installer.sh | bash
The installer sets up Docker, Node.js, and a systemd service (scp-console-server), then generates an API key. Copy the API key shown at the end of the installation — you’ll need it in the next step.
You can re-check the service at any time with:
systemctl status scp-console-server
3. Open the required firewall ports #
The Console Server needs the following reachable:
- Ports 80 and 443 — open to the public internet. Port 80 is used only for the Let’s Encrypt certificate challenge and a redirect to HTTPS; port 443 carries the actual console sessions.
- Port 3000 — the management API. This only needs to be reachable from your SynergyCP master.
Without a working public DNS record and ports 80/443 open, the Console Server cannot obtain its SSL certificate and consoles will stay in a “warming up” state.
4. Register the Console Server in SynergyCP #
In SynergyCP, go to Network → Deploy Console Servers and create a new Console Server with the following fields:
- Name — a friendly name for this Console Server (for example,
US-East Console). - Hostname — the fully qualified domain name of the Console Server (for example,
console.example.com). Enter the hostname only: nohttp://prefix, no port, no path, and not an IP address. - API Port — the management API port. Leave this as
3000unless you changed it during installation. - API Key — the API key printed at the end of the installation.
Click Save.
5. Assign the Console Server to IP Groups #
When editing the Console Server, set the IP Groups field to the IP group(s) for the location this Console Server serves. SynergyCP uses this to decide which Console Server to use for a given server: when a user launches a console, SynergyCP finds the server’s IP Group and routes the session to a healthy Console Server assigned to that group.
Make sure every location where you want Containerized Consoles has at least one healthy Console Server assigned to its IP Group.
6. Verify SSL and health #
SynergyCP automatically pushes the SSL configuration (your installation’s SSL contact email plus the Console Server hostname) to each Console Server, which then obtains and renews its Let’s Encrypt certificate on its own. No manual certificate management is required.
Check the Health column on the Console Servers page:
- OK — the Console Server is reachable and ready.
- Warning — reachable, but reporting a non-fatal issue.
- Error — SynergyCP cannot reach the Console Server. Re-check the hostname, API port, API key, and that the service is running.
- Unknown — health has not been checked yet. Use the refresh control to run a check.
Once the SSL certificate has been issued, the Console Server is ready to serve sessions.
7. Enable Containerized Consoles on servers #
Containerized Consoles are enabled per server by setting the server’s Launch KVM Action. Select one or more servers, choose Assign Launch KVM Action, and set the action to Containerized Console. Then choose:
- Console Image — the container image to run for the session (for example,
synergycp/bm-console-container-legacy). - Console Tag — the image version/tag to use.
Save the assignment. Those servers will now use a Containerized Console when a console is launched.
The list of available console images comes from a catalog that is cached for performance. If a newly published image or tag isn’t listed yet, use the Refresh console image catalog control on the Console Servers page to pull the latest list.
Using a Containerized Console #
Once a server is configured, the experience for an end user (customer or staff member) is:
- On the server’s management page, click Launch KVM.
- SynergyCP creates the session and, as soon as it’s ready, opens the console in a new browser tab automatically.
- If the Console Server is still obtaining its certificate, the user sees a message that the session is warming up. The session can be opened from Manage Consoles a moment later, once it’s ready.
The Manage Consoles page lists active sessions and shows, for each one, the server, the Console Server handling it, the source and destination IPs, when it was created, and when it expires. From there a session can be opened (when ready) or deleted.
A session stays alive for 24 hours. If the same user launches a console again for the same server from the same source IP while a session is already active, SynergyCP reuses that existing session instead of spinning up a new container — and resets its lifetime to a fresh 24 hours. Each session is locked to the source IP that created it and is automatically removed once it expires, even if the user forgets to close it.
Permissions #
Two sets of permissions control access to this feature.
Console Server administration:
- Read (
network.console.read) — view the Console Servers page. - Write (
network.console.write) — create, edit, and delete Console Servers.
Console session management:
- Read (
network.console_session.read) — view active console sessions on the Manage Consoles page. - Write (
network.console_session.write) — create and manage console sessions. - Delete (
network.console_session.delete) — terminate (delete) console sessions.
Assign these to staff groups as you would any other SynergyCP permission. Customers do not need these permissions to launch a console for their own servers.
Troubleshooting #
- Health shows Error. Confirm the hostname resolves, port 3000 is reachable from the SynergyCP master, the API key matches, and
scp-console-serveris running on the Console Server (systemctl status scp-console-server). - Consoles stay “warming up”. The Console Server hasn’t obtained its SSL certificate yet. Verify the public DNS A record is correct and that ports 80 and 443 are reachable from the internet, then allow a few minutes for issuance.
- “No healthy console server” when launching. The server’s IP Group has no healthy Console Server assigned. Assign a Console Server to that IP Group, or fix the health of the one already assigned.
- An image or tag is missing when assigning a server. Use Refresh console image catalog on the Console Servers page to refresh the available images.
Upgrading #
There are two independent things you may need to keep up to date: the Console Server software running on each VM, and the console container images used for sessions.
Upgrading the Console Server software #
To upgrade a Console Server, re-run the installer on that VM as root:
curl -fsSL https://distribution.synergycp.com/scripts/console-server-installer.sh | bash
The installer detects the existing installation and upgrades it in place. Your configuration, certificate, and API key are preserved, so you do not need to re-register the Console Server in SynergyCP. The scp-console-server service is restarted automatically when the upgrade finishes.
Repeat this on each Console Server VM. After upgrading, confirm the Health column on the Console Servers page returns to OK.
Updating console images #
The console container image is what actually runs inside each session. New image versions are published to the console image catalog. To move servers onto a newer image:
- On the Console Servers page, use Refresh console image catalog to pull the latest available images and tags.
- Re-assign the affected servers’ Launch KVM Action (see Enable Containerized Consoles on servers) and select the newer Console Tag.
Existing sessions keep running on the image they started with; the new image is used the next time a console is launched.